Choose the right guide for your role
Everyone: start with joining your organisation, clocking, viewing your schedule, requesting leave and sending feedback.
Managers and admins: continue with adding staff, assigning work policies, planning shifts, reviewing attendance and managing leave. Your role name alone does not guarantee every action: menus depend on capabilities and enabled modules. If a menu is missing, ask your owner to check both rather than create another account.
Owners: start with organisation setup, modules, access and ownership. Only one person is the Admin-Owner. Only the owner can create another Admin or transfer ownership. Platform operators use a separate MFA-protected account; being an organisation owner does not give platform access.
Set up an organisation
- Register your owner account. Enter your name, email and matching password confirmation. If the email is already registered, use sign in or account recovery rather than duplicating the account.
- Enter the organisation name, country, timezone and currency. Suggested values are editable; travellers and VPN users should check them carefully.
- Choose an initial blueprint: fixed weekly, variable or custom. This creates a starting work policy, not a permanent restriction. You can add policies for other kinds of staff later.
- Review overtime thresholds, multipliers and agreed hours. Do not accept an example as a legal requirement for your country.
- Confirm the review and create the organisation. Use Getting started to visit each setup area.
Suggested order: review settings, create work policies, add staff and compensation, enable optional modules, create shifts and leave types, then test a normal attendance and approval cycle. Use a test employee and clearly identified test records during training.
Return to setup and control help tips
Owners can reopen Getting started from their account menu. When following a setup task, use Back to Getting started instead of the browser Back button. Show me where highlights a relevant control. Restart page tour reopens the page guidance.
Dismiss help when you no longer need it, or use Finished Setup to finish the guided setup. Finishing setup is a preference, not verification that payroll settings are legally correct. Field examples explain the effect of inputs; review the saved settings yourself after submitting.
Manage organisation settings
Open Settings → Organisation. Admins can manage available organisation policies; changing the name or timezone is restricted to the owner. Save and reopen the page to confirm the result.
The timezone determines local business dates, not your computer's timezone. Do not change it merely because one staff member is travelling. A change may be blocked when historical attendance has no verified timezone. Contact support for review; do not edit timestamps to bypass the protection.
Currency is recorded during setup. It does not perform exchange conversion, configure tax or establish the currency of old payroll. New payroll calculations currently require a supported two-decimal currency. Other organisation functions remain available when payroll precision is unsupported.
Organisation settings also control leave visibility and coverage handling. Review whether colleagues should see full leave details, dates only or only their own requests. Coverage warnings and required overrides are separate from leave balances.
Add a staff member
Staff are grouped by team. Select a team heading to collapse or expand it, or search by name or email across teams. Salary amounts are hidden in the directory. Authorised admins can open an individual profile to view and change compensation.
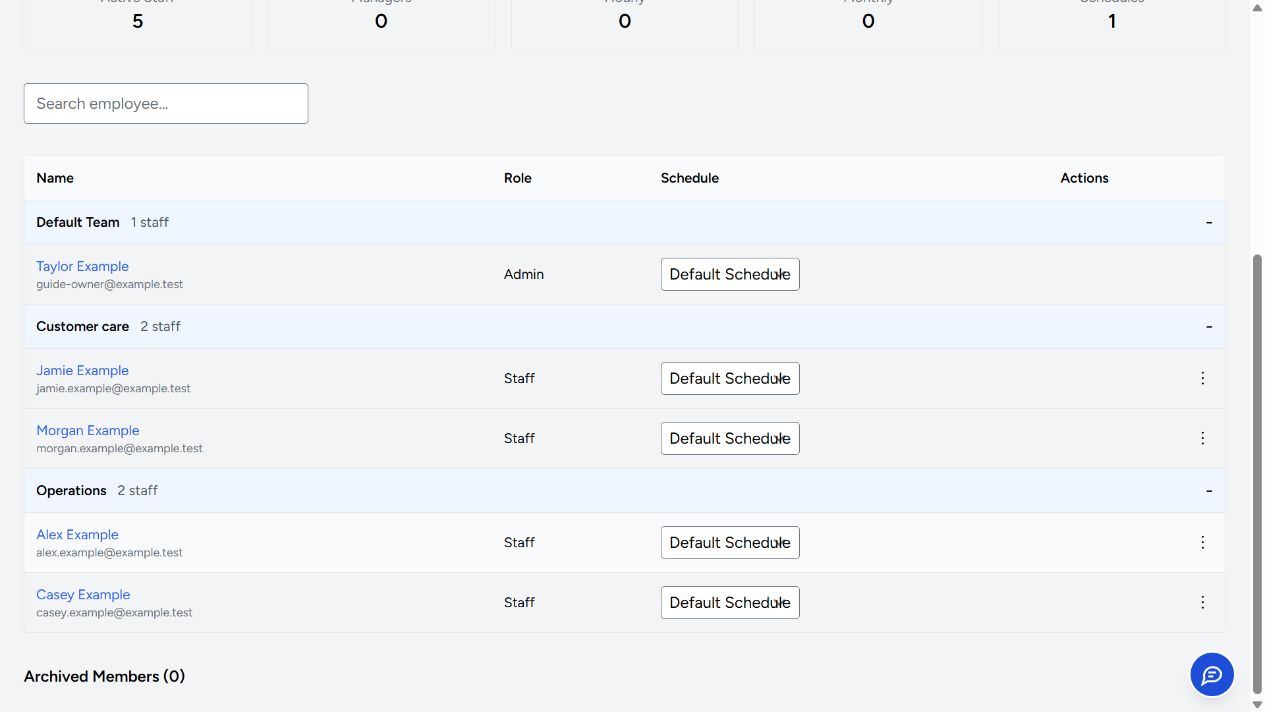
The screenshots in these guides use fictional example people and organisations. Your available actions depend on your permissions and modules.
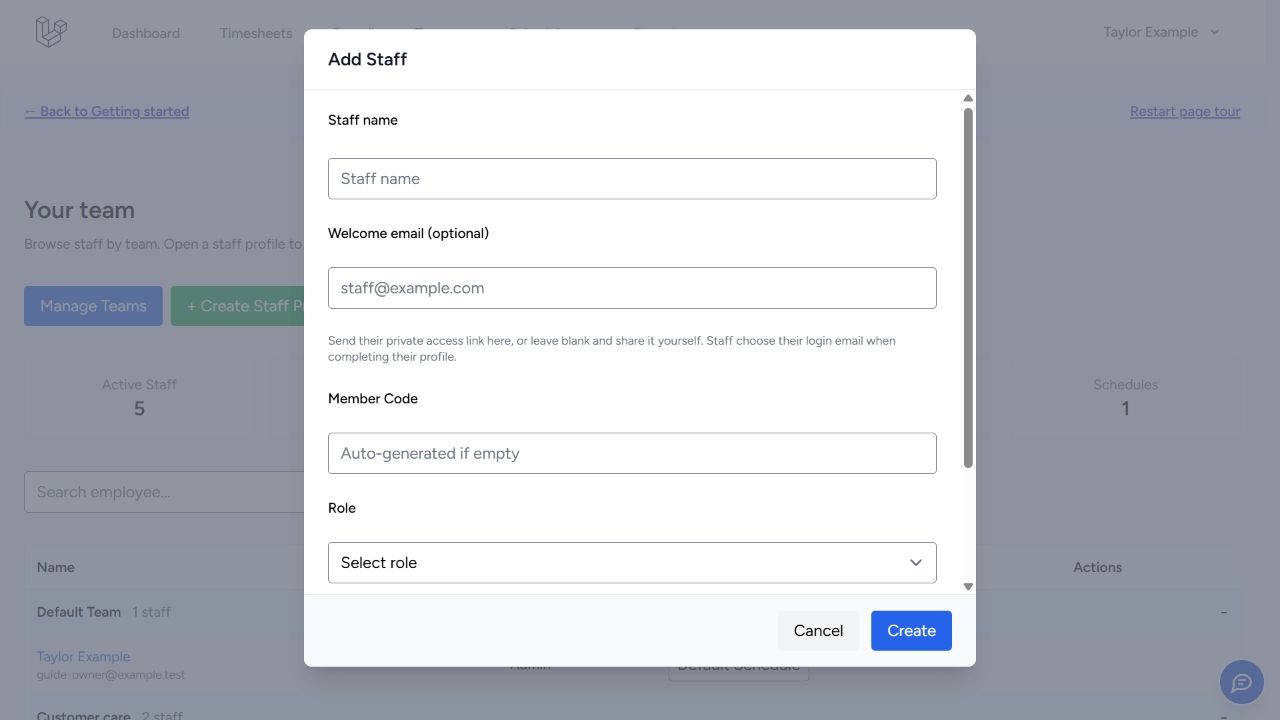
Requires permission to manage the target member. Open Team, then the add-staff action.
- Enter the name managers should recognise on the roster, for example Jamie Tan.
- The welcome email is optional. Supply an address to send the private access link, or leave it blank and share the link privately yourself. It does not fix the employee's eventual login email.
- Leave Member Code blank to generate one, or enter your internal identifier. This is not a password.
- Choose the least privileged suitable role. Do not make ordinary staff Admins to work around a missing menu.
- Review the private clock-link expiry setting and create the member.
- Open their profile, assign the appropriate work policy and, if needed, enter compensation with the correct effective date.
Only share a personal clock link with its intended employee. Never paste it into feedback, a public chat or a screenshot. Check the staff list after saving; do not submit repeatedly if the response is slow.
Join an organisation and complete your profile
Use the invitation or private access link your manager provided. Complete the required profile fields and confirm your password where requested. Staff choose their login email when completing their profile. An email entered by a manager for a welcome message is not necessarily that final login email.
If a link expires or access is revoked, contact your manager for a replacement. Do not register a new organisation to join an existing one. If the profile prompt appears again, check the validation message and complete the missing field before retrying.
Change staff access and compensation
Open the staff profile from Team. Available roles are restricted by your own access. A read-only profile means you cannot manage that member. The owner cannot be archived, deleted or demoted while they remain owner.
To change only a role or work policy, leave the compensation-change option unchecked. For compensation changes, select hourly or monthly salary, enter the amount and effective date, and save. Effective dates matter: future compensation should not be used for earlier work. Saved approved payroll remains historical evidence, not a live calculation of the current salary.
Review archival and reactivation options when someone leaves or returns. Archiving is not a request to erase payroll or attendance history. Access changes can require the member to sign in again. Removing staff is not a substitute for correcting an incorrect payroll batch.
Archived staff are excluded from the active dashboard team list and work-policy assignment choices. Their historical assignments, attendance and saved payroll remain available as historical evidence. Archiving does not itself establish a final salary or termination-proration rule.
Create and assign work policies
Open Schedules → Work Policies. Shared work policies remain available independently of the optional Scheduling module. Create a clearly named policy, such as Full time weekly or Hourly flexible, then assign it through the staff profile.
Overtime threshold: controls when applicable worked minutes move into overtime. Example: a weekly threshold of 40 hours means 42 qualifying hours may include 2 weekly overtime hours, subject to the configured rules and other classifications.
Contractual weekly hours: agreed hours used to derive an hourly equivalent for monthly salary. They do not determine when overtime starts. Example: 40 agreed hours and a 44-hour overtime threshold serve different purposes. Hourly-only staff without agreed weekly hours can leave contractual hours blank; monthly-salary attendance additions need a valid basis.
Overtime multiplier: 1 means ordinary rate; 1.5 means one and a half times the applicable hourly rate. Rest day arrangement: fixed days recur on chosen weekdays; shift-based rest days follow the roster. Review break deductions, public-holiday and rest-day options separately.
Save, reopen and check values. A blueprint is only a starter: fixed and variable policies can coexist in one organisation. Changing a policy does not rewrite saved payroll; use effective assignments and review future results.
Create shift types
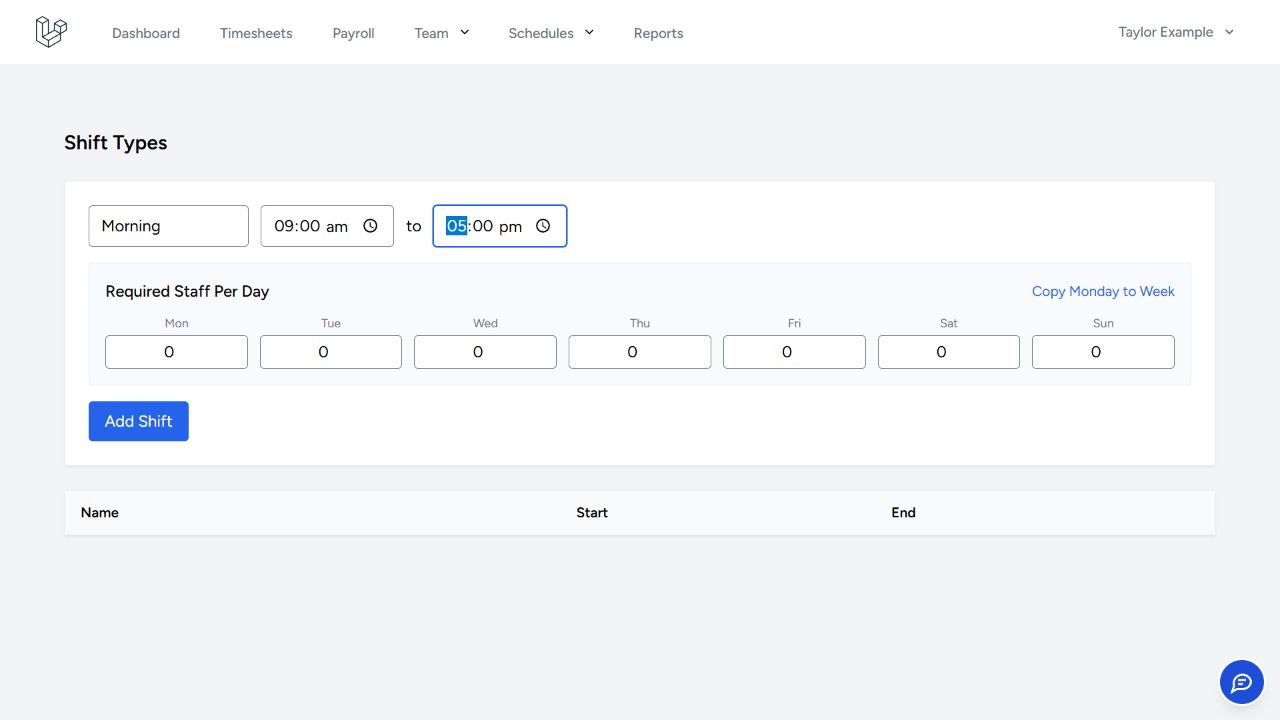
In this example, enter Morning, 09:00–17:00, then the number of staff needed on each day. Review the fields before choosing Add Shift.
Requires Scheduling and schedule-management permission. Open Schedules → Shift Types.
- Enter a recognisable name, for example Morning.
- Enter start and end times, for example 09:00 to 17:00. These are local schedule times, not UTC.
- Set Required Staff Per Day for the relevant days. Copy Monday to Week copies that count across the displayed week; review before saving.
- Click Add Shift and confirm it appears in the existing shifts list.
Creating a shift type does not assign employees or publish a roster. Continue to the planner. Staffing requirements created here are dated records for the current week; check the week you actually plan. A shift with assignments cannot be deleted. Removing an otherwise unused type can invalidate associated availability, so review that impact first.
Build and publish a roster
Open Schedules → Schedule Planner and choose the intended week.
- Review staff availability and existing leave before assigning work.
- Select the employee and day, then choose a shift. Check start/end times and staffing coverage.
- Review the whole week, including unassigned days and any leave conflicts.
- Choose Publish Schedule. Read the impact preview: publishing marks unassigned days OFF and makes the completed week visible to employees.
- Confirm, then check the Published status and ask a test staff member to review My Schedule.
Draft planning is not the same as published work. Publishing is not clocking staff in. Edits after publication may affect coverage or leave evidence, so review the warning before changing or unpublishing a week. Do not remove approved leave merely to make a shift fit.
View your schedule and submit availability
Open Schedules → My Schedule. Check the week and distinguish published shifts from availability you submitted. Availability expresses a preference; it is not approval to work a shift and does not replace the published roster.
Submit your available dates or shifts using the controls offered, then check the submission status. Tell your manager promptly when availability changes. If the roster and your understanding disagree, ask before clocking a different shift.
Clock in and clock out
Use the dashboard attendance control or your private clock page. Clock in at the actual start of work and confirm the active state. Clock out when finished and verify the completed entry in Timesheets.
If location checks are enabled, allow browser location access and ensure you are at an authorised location. Location accuracy and site restrictions are separate from the organisation timezone. Do not repeatedly clock in to troubleshoot an existing open entry; review it or contact a manager.
An overnight shift can finish on the following local date. Duration uses elapsed time, while day-based rules use local business dates. During daylight-saving changes, elapsed hours can differ from the apparent clock difference. Break deductions are applied according to the work policy and recorded entry.
Review and correct attendance
Staff can review their own timesheet and available audit history. Managers with editing permission can open the timesheet overview, select the date or entry, and edit or add attendance.
- Check the employee, date and timezone. For an overnight entry, set the clock-out date to the following day.
- Enter actual clock-in and clock-out values. Leave clock-out blank only if the employee is genuinely still working.
- Give a meaningful reason, such as Missed clock out confirmed with employee.
- Save and reopen the entry. Check payable minutes, overlap warnings and the audit trail.
Approved attendance cannot be edited directly. Follow your authorised correction process; never alter old timestamps to force a desired payroll result.
For UTC-backed entries, a repeated daylight-saving hour offers First occurrence and Second occurrence, each with an offset. Confirm which occurrence happened rather than guessing. A skipped clock time is rejected. Legacy entries with an unverified timezone are not silently converted by this control; ask support if their historical meaning is unclear.
Create leave types
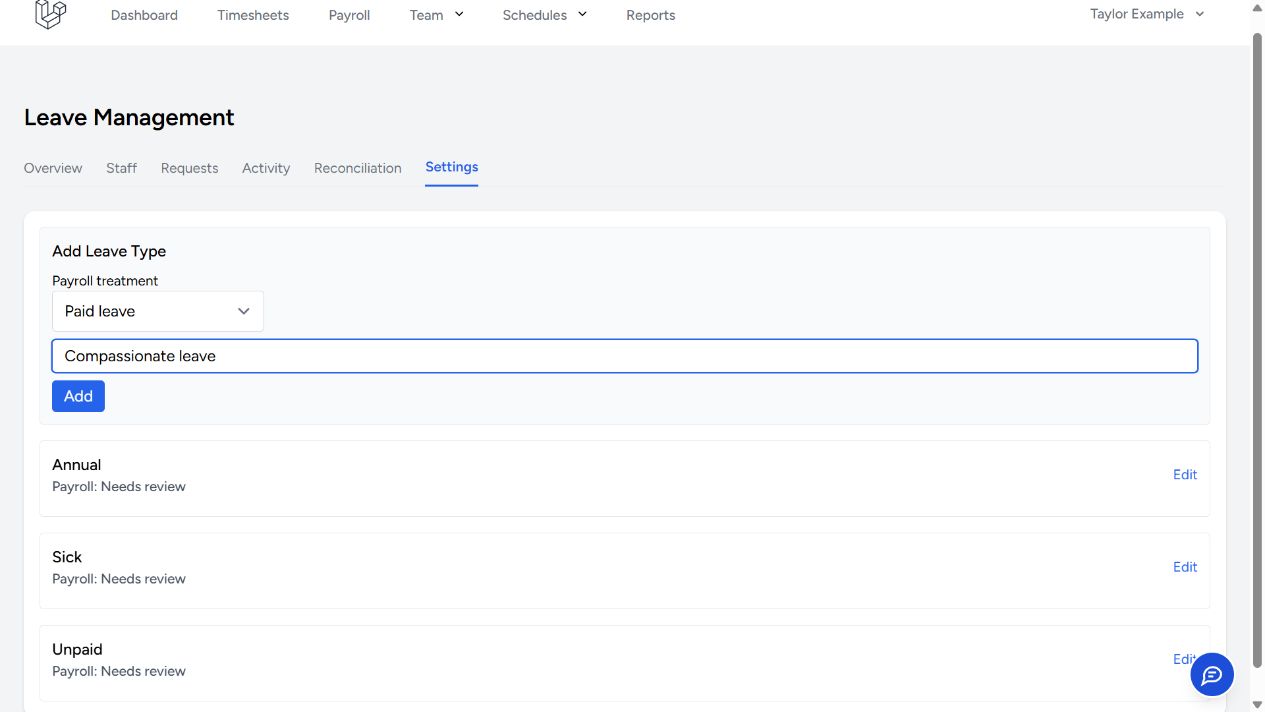
Choose Paid leave or Unpaid leave explicitly. The example shows a new type before saving. A name such as Annual or Unpaid is not evidence of payroll treatment: review any existing type marked Needs review.
Requires Leave Management and leave-management permission. Open Team → Leave Management, then the Settings tab.
- Under Add Leave Type, enter a clear name, such as Annual Leave or Study Leave.
- Choose Paid leave or Unpaid leave under Payroll treatment, then click Add.
- Review its available policy controls, including deduction order and whether it is used for public-holiday credit.
- Save policy changes and check them before processing requests.
Existing types initially show Needs review. Set their treatment explicitly; names such as Annual do not determine pay. New approvals preserve the treatment of the balance types actually consumed. Later policy edits do not relabel approved leave or payroll. Historical approved leave without a saved treatment remains unverified and needs external confirmation during salary review.
Paid leave does not reduce monthly base salary. For monthly-paid staff, approved unpaid leave is calculated in Reports using monthly salary divided by scheduled working days in the month, multiplied by unpaid working days. Half-days are prorated and rest days excluded. This is the displayed software policy, not a country-specific statutory guarantee. Unclassified, pending or ambiguous leave requires review. Hourly paid-leave pay is not automatically added by this monthly-salary workflow.
Creating a type does not establish every employee's entitlement. Set and review balances separately. Deduction order affects which balance is consumed; avoid changing it casually after requests have been approved. Removing a type disables it rather than erasing its historical use. Public-holiday credit settings can trigger reconciliation; inspect any resulting review items.
Set and adjust leave balances
Open Team → Leave Management and select the employee and leave type in the balance-adjustment controls. Review current entitlement, used and remaining figures.
Choose the appropriate adjustment mode, enter the amount and a clear explanation, then review the preview before saving. Example: add an agreed entitlement increase, rather than modifying an unrelated request to make the balance match. Check the resulting balance and Leave activity after the change.
Balances, rest-day entitlement and public-holiday credits are different records. An approved request can consume more than one source according to deduction order. Use its evidence and activity log to understand the movement; do not assume the displayed request length always equals the deduction from one balance.
Request leave and cancel a request
Open Schedules → My Leave. Choose the leave type and dates, review the preview of deductions and coverage, and submit. Confirm the request appears with its status. A submitted request is not approved leave.
If a balance or coverage warning appears, review the dates and contact your manager; do not submit another type solely to bypass it. Leave dates are local calendar dates and should not move when you travel or change device timezone.
To cancel, use the request's cancellation action and provide the reason. An already approved request can require cancellation approval. Until that decision is complete, do not assume its balance has been returned or the day is available for rostering.
Approve leave and review reconciliations
Requires leave-approval permission. Open the organisation's leave-management area and review pending requests, deduction evidence and coverage warnings. Approve or reject with the available reason controls. Where coverage requires an override, record the actual justification.
Review cancellation requests separately. Approving cancellation and rejecting cancellation have different effects; check the employee's balance and activity history afterwards.
Rest-day settlements and public-holiday credits may need review when their source changes. Inspect the reconciliation note before choosing retain or reverse. Retain preserves the reviewed settlement; reverse can undo associated credit or compensation through the supported workflow. Payroll-related settlement actions require Payroll access. Never handle a reconciliation by deleting its source evidence.
Configure holidays and private calendars
Open Schedules → Holidays if your role permits it. Review the organisation's holiday dates and relevant groups. Holiday configuration is separate from an overtime multiplier and from a leave credit policy; check all applicable settings rather than assuming adding a holiday automatically configures every outcome.
Organisation settings can enable a private schedule calendar feed. Treat the URL like a password: anyone holding it may be able to read the feed. Share only with intended recipients. Regenerating it replaces the old token, so existing subscribers need the new URL.
Review approve and finalise payroll
Requires the Payroll module and appropriate payroll/attendance permissions. Verify staff compensation effective dates, work policies, breaks, open entries, overlap warnings and unresolved leave or entitlement choices first.
Review the relevant period and approve attendance through the supported timesheet workflow. Inspect the saved Payroll batch: period, regular and overtime minutes, base salary, adjustments and total. Approval and finalisation are different: finalisation locks the reviewed outcome. Do not finalise just to dismiss a warning.
Late entries can require supplementary payroll with a reason. Supplementary payroll preserves the original approved snapshot rather than paying the same monthly base salary again. Voiding preserves an audit record and can reopen supporting attendance; only do it when you understand the effect.
Amounts shown as Unverified currency lack recorded historical currency evidence. They are not automatically SGD or today's selected currency. Mixed currencies must not be combined into a single monetary total. Current payroll precision is two decimal places; unsupported precision is blocked for new calculation rather than silently rounded.
Understand automatic monthly salary
Open Reports and select the month. Base salary appears automatically from effective compensation. There is no separate Monthly payroll screen. Paid leave and missing clock-ins do not reduce base salary; approve attendance separately for additions.
- Check the monthly salary and effective dates. A full month receives the agreed salary; partial months or salary changes use calendar-day proration.
- Review unpaid-leave deductions and their date-by-date calculation: monthly salary ÷ scheduled working days in the month × unpaid working days. Half-days count proportionately and rest days are excluded. Fixed work policies supply weekday rules; variable schedules require a complete published roster. Missing roster dates are not assumed to be rest days.
- If Leave Management is off, existing approved leave is still considered, but external leave may be unavailable; the report states this assumption. Unknown treatment, pending leave, incomplete rosters and possible duplicate deductions produce a Needs review result. Correct the source evidence rather than inventing a deduction.
- Calculated salary is labelled separately from saved amounts. Opening or exporting Reports never approves payments or rewrites saved payroll. The normal Finalize payroll action for a complete month saves and locks its calculated salary and deduction alongside existing additions. A weekly finalization does not lock a whole month's salary. Existing saved base is credited, not paid twice.
The historical reconciliation screen is disabled during beta. Conflicting or overlapping saved base, unverified compensation boundaries and ambiguous leave are flagged instead of guessed. Existing approved or finalized salary remains unchanged. Review the saved evidence before requesting a separate correction.
Attendance additions for monthly staff
Attendance approval creates separate additions, never another slice of monthly base. The hourly equivalent is monthly salary × 12 ÷ (52 × contractual weekly hours). Contractual hours are needed for additions, not for calculating base salary alone.
Extra overtime pays the full configured OT multiplier. PH and rest-day hours already covered by base salary receive only the excess above 1×. For each overlapping hour, Stafflio selects the highest additional rate and never sums the categories. Equal rates use OT, then PH, then rest day as a consistent reporting label.
For example, after 40 hours in a week with a 44-hour threshold, an eight-hour Saturday produces four ordinary hours and four OT hours. If Saturday is also a rest day at 2× and a PH at 1.5×, its first four hours receive the 1× rest-day top-up; its last four receive 1.5× OT instead. No hour receives both additions.
Batch details and saved-record exports show the source attendance, date, hours, hourly equivalent, winning multiplier and amount. Categories are rounded once; the last detail line absorbs rounding differences.
Separate cash or time-off settlements cannot silently stack with these additions. Conflicts stop approval for review in either direction. Existing benefits are not deleted automatically. Late attendance that would change an approved allocation, or an overnight entry crossing a month or compensation boundary, also needs explicit correction or splitting before approval.
If Payroll is disabled, timesheets can still be approved as attendance only. No salary is generated, and enabling Payroll later does not automatically back-pay those entries.
Read reports and export data
Open Reports, choose the month and use the permitted export action. Attendance-only access does not grant payroll export access. Protect downloaded files because they may contain staff names and pay information.
Attendance selection uses the recorded local clock-in date. An overnight entry is included in the month of its local clock-in, not moved to another month because its UTC instant falls on another date. UTC-backed rows show local time, offset and recorded timezone. Legacy rows show stored wall time and an unverified-timezone label; no offset is invented.
Saved payroll amounts are not recalculated by opening a report. A historical batch spanning months is listed separately at its full saved amount; it is excluded from the monthly subtotal rather than split without evidence. Currency groups have separate subtotals. Do not add a cross-month batch twice or combine different currencies. Saved assumptions, addition calculations and salary approval notes appear in reports and in the Saved Payroll Evidence export. Review-only export rows have no payable amount.
Usage CSV uses local time and counting timezone, without a duplicate UTC timestamp column. In attendance workbook detail, allocated entry amounts are labelled as allocations from the saved batch, not independent payroll recalculations.
Enable modules and understand beta usage
Open the organisation's Modules page using an account with permission. Core essentials are always free. Optional tools are free during beta; enabling them does not authorise future charging.
Select the module, read dependency and impact checks, choose a reason or write another reason, and confirm the requested action. Disabling retains records but blocks relevant screens and new activity. Some pending work or dependent modules must be resolved first. Shared Work Policies and core clocking remain available.
A platform operator can pause availability for new activations while testing a module. This is different from disabling an organisation's existing module. Contact support if a module is unavailable; do not use an old URL to bypass the control.
Owners can review Usage from Settings. Each qualifying staff member counts once per module per month, according to the displayed rule and first qualifying action. Counts across modules are not unique headcount. Enabling a module or viewing its page is not proof that every staff member used it. Review the evidence, recorded timezone and rule version; export it if needed. Beta usage is evidence for validating the future pricing model, not an invoice or a promise of a final price.
Use location controls
With Geo Fencing enabled and the necessary permissions, open Team → Geo Fencing and review authorised work locations and boundaries. Test a normal clock-in from an intended location before relying on the restriction.
If clocking fails, check browser permission, device accuracy and the actual site boundary. Disabling Geo Fencing stops enforcement of saved location restrictions but retains saved locations. Review and confirm that impact; do not disable it as an unexplained workaround.
Use inventory and fulfilment
Requires Inventory and the relevant view/manage permissions. Under Inventory → Products, create or import products and review identifiers and quantities. Confirm import mappings and preview data before completing an import; do not assume duplicate scans or identifiers represent distinct products.
Under Inventory → Orders, create or review an order, open its packing screen, scan the required products and verify quantities before completion. Review remaining work if completion is blocked. Pending fulfilment work may also block disabling Inventory. Real stock movements can qualify usage; merely viewing the page does not.
Transfer ownership and protect access
The owner opens Settings → Ownership, chooses an eligible active member and confirms the action with their password. Ownership remains pending until the nominated member accepts. The page shows expiry; arrange acceptance before it expires.
Do not share the owner's credentials as an alternative to transfer. Protect private clock links, calendar feeds and exported payroll. Review staff access when people leave, and give the least privilege needed. Organisation suspension is controlled by platform operators and is separate from beta participation or complimentary-access records.
Send product feedback
Use the floating feedback button; Send feedback in the account menu is a fallback. Describe the page, what you expected, what happened and the steps to reproduce it. Attach a screenshot when useful and use the available annotation controls to point out the issue.
Inspect the screenshot before submitting. Remove passwords, private links, payroll values and unnecessary staff details. Feedback goes to Stafflio platform admins for improving the product, not your organisation's managers. Platform triage notes are internal and do not automatically send a reply to you. For an urgent attendance correction, also contact your manager through your normal channel.
Troubleshooting and support checklist
- A menu is missing: check your role, capabilities, module state and completed profile with the owner.
- A save appears to do nothing: read field errors and the message at the top; keep the form open until you know whether it saved.
- A page is blank after an update: refresh once, then report the page URL and time. Do not share cookies, session tokens or private links.
- A time looks wrong: record the displayed time, offset and organisation timezone. Do not overwrite historical attendance to test a theory.
- A month report is blocked: inspect the stated cross-month or currency reason and review individual saved batches. Do not recalculate history as a workaround.
- A balance differs from the request length: review deduction order, rest-day use and the leave activity evidence.
- A link no longer works: ask an authorised manager to check expiry, membership and organisation access.
When reporting a problem, include the task, page, approximate local time and timezone, exact error and safe reproduction steps. Avoid repeated submissions that could create duplicate work. Keep saved payroll and historical evidence intact while the issue is reviewed.
No guides match. Try fewer words, such as “leave” or “shift”.